1
Stabilize the starter route
Finish Prologue, run the First Hour loop, unlock Flashlight, and get the Digestion gene before making the Welcome Center trip feel like a long rescue swim.
Open progression routeUse this checklist after the Angel Comb route and before your first serious base. It keeps the Welcome Center, southwest wreck, Habitat Builder recipe, and return-home craft in one clean order.
Updated .
This is the short version of the route: prepare, clear the facility, grab the nearby vehicle-chain scans, then come home and build.
Finish Prologue, run the First Hour loop, unlock Flashlight, and get the Digestion gene before making the Welcome Center trip feel like a long rescue swim.
Open progression routeCarry Scanner, one spare Basic Battery, enough food and water, and Air Bladder if you use it for emergency oxygen or fast ascent.
Air Bladder controlsSwim southeast at about 150 degrees, scan the Habitat Builder fragments, power the facility, and choose your first Biolab upgrades.
Welcome Center guideFrom the Welcome Center, aim southwest between 210 and 240 degrees and scan Dive Elevator, Beacon, and the first Tadpole fragment.
Open map markerHead home, gather a little Titanium on the way back if your inventory allows, then craft Habitat Builder before chasing later vehicle systems.
Habitat Builder pageCheck items off as you play. Progress is saved in this browser only.
These are the scans and systems that make the route worth doing before you settle your first base.
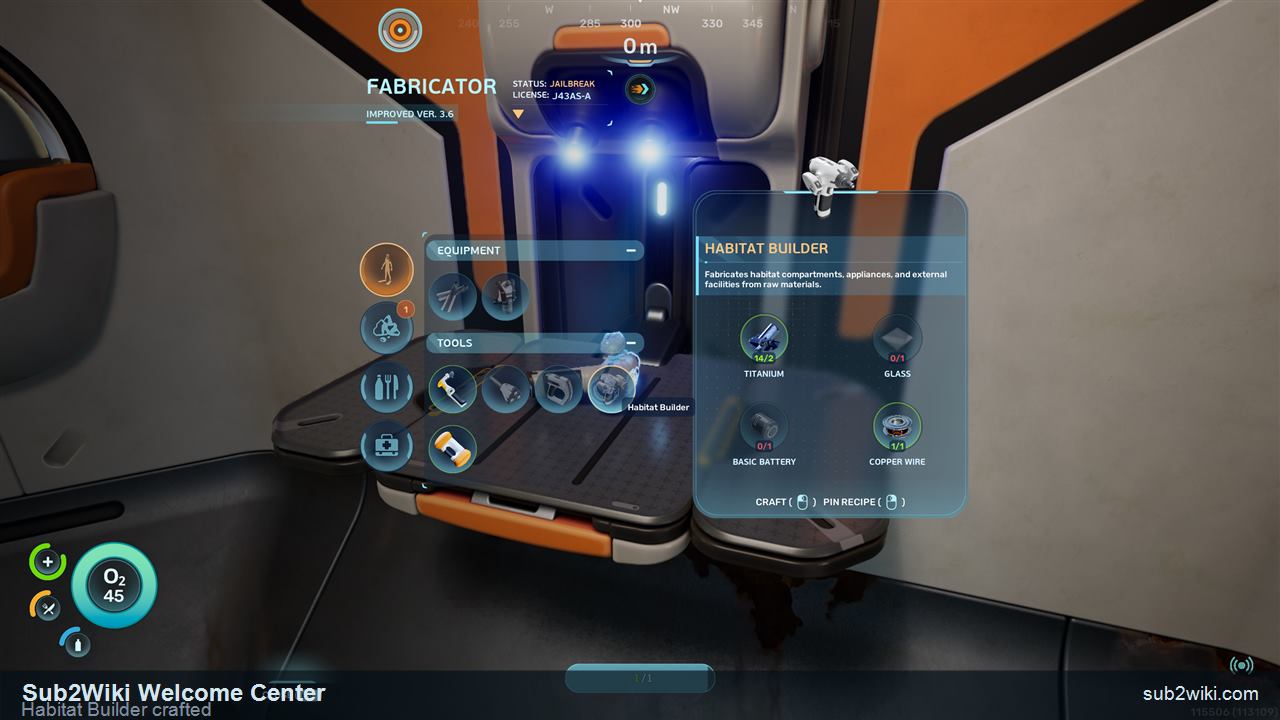
The builder craft itself is the important bottleneck: 2 Titanium, 1 Glass, 1 Basic Battery, and 1 Copper Wire. The sub-craft math that matters before leaving home is simple: 1 Glass needs 2 Quartz, and 1 Copper Wire needs 2 Copper.
If you are short on power parts, treat the spare Basic Battery as a route item first. Powering the Welcome Center keeps the Biolab and NOA path moving, while the return trip gives you another chance to gather Titanium.
Do not stay at the southwest wreck longer than necessary on the first pass. Scan the key fragments, open the supply crate, and return while the route is still clean.
The Welcome Center power step becomes a forced return trip.
The tool is not ready until the second fragment is scanned in the cave route.
You miss Beacon, Dive Elevator, and the first Tadpole fragment while already nearby.
Glass and Copper Wire can consume raw resources you meant to keep for another tool.
For the Habitat Builder craft, prepare 2 Titanium, 1 Glass, 1 Basic Battery, and 1 Copper Wire. The sub-crafts covered here are 1 Glass from 2 Quartz and 1 Copper Wire from 2 Copper.
The early route is the Welcome Center southeast of the Lifepod at about 150 degrees. Scan the entrance fragment, then use the cave route for the second fragment.
Yes. Bring one spare Basic Battery before leaving. The facility power step is much smoother when you are not forced to return home mid-route.
Before returning home, swim southwest between 210 and 240 degrees to the nearby wreck and scan Dive Elevator, Beacon, and the first Tadpole fragment.
The full order from Prologue to first base.
Step-by-step facility route, Biolab picks, and southwest wreck follow-up.
Tool page for scan route, material prep, and first-base planning.
Starter power part for Scanner, Welcome Center, and Habitat Builder prep.
Craft one Glass from 2 Quartz for the builder.
Craft one Copper Wire from 2 Copper for the builder.
Open the map marker for the 210 to 240 degree wreck route.
Use the recipe hub for station and material-family planning.